

Our partner, XM, lets you access a free demo account to apply your knowledge.
No hidden costs, no tricks.

The hype surrounding NFTs has recently died down, but this does not mean that NFTs are fully gone. While most people look at NFTs as just simple pieces of art or some sort of digital picture, they are more than that. NFTs give people the ability to protect their digital creations, be it in the form of pictures, music, videos, or anything else that can be digitized.
With the help of NFTs, people can gain ownership of certain digital assets and have full proof of ownership and control over these assets. But thanks to the popularization of PFP NFTs, the majority of people got the wrong idea about NFTs, and think of them as just simple and dumb pictures. If you are someone who is interested in NFTs and wants to create one for yourself, you have come to the right place. Today we will explain everything you need to know when it comes to creating your own NFTs.
The first step when creating an NFT is to decide what you actually want to create. As we mentioned before, NFTs can be anything that is present in digital space. These can be pictures, videos, music, or something else. When creating this NFT, you might want to create something for fun and don’t really care about its price or anything else. But if you want to make an NFT in order to then sell it or monetize it in some ways, it is important to thoroughly think about what you want to create.
When doing so, first you need to make sure that the NFT you are creating is unique and is not owned by someone else. If you take someone else's work, turn it into NFT, and then try to sell it, you might get in trouble. For example, in the U.SNFTs are considered digital asset securities, and if you were to steal someone else's work and turn it into an NFT, you might get into some legal trouble.
When deciding what to create it’s also important to look at what's in demand. The NFT market is diverse and there are many different types of NFTs, and because of this, studying the market to see what NFTs are best at the moment is a good first step.
Once you have decided what you want to create, the next step is to decide what blockchain you want to use. This blockchain will store the information about your NFT permanently and will ensure that no one has access to your NFT other than you, or someone else to whom you sell or transfer your NFT to. There are multiple different blockchains that allow you to create and store NFTs, and you should choose the one you like the most and one that fits your needs. Let’s take a look at some of the most popular blockchains for NFTs.
Ethereum is the largest blockchain in the world and it should not be surprising that it is also the most popular blockchain when it comes to creating NFTs. The reason Ethereum is so popular when it comes to NFTs is that it’s a blockchain that a very large number of projects call home. There are numerous NFT projects that are created on Ethereum, thanks to the big number of utilities this blockchain brings. When creating NFTs on the Ethereum blockchain, it will utilize an ERC-721 standard, which is a special standard designed for storing NFT metadata on the blockchain.
The majority of NFT marketplaces that give us tools for creating NFTs give us the option of creating them on the Ethereum Blockchain. Marketplaces such as OpenSea and Rarible all give us options for creating NFTs on the Ethereum blockchain. Since the Ethereum blockchain has moved to the Proof-of-Stake protocol, it has also become a more eco-friendly blockchain. But if you plan on using the Ethereum blockchain for creating your NFTs, be prepared to pay hefty gas fees on future transfers.
Solana is a popular alternative to the Ethereum blockchain when it comes to creating NFTs. In essence, the Solana blockchain is much faster and cheaper than Ethereum, thus creating NFTs here might be more beneficial. Solana uses both Proof-of-History and Proof-of-Stake protocols making it very fast and cheap to use. Transactions and transfers made on Solana come with pretty much non-existence fees, and the most you have to pay is around $0.01.
But the Solana blockchain has been notorious for inconsistencies. There are times when the blockchain is overloaded and transactions are failing. It’s also a relatively new blockchain and is not as big as Ethereum. Because of this, if you are looking for bigger exposure and more stability, Solana might not be a place for you. But if you want a fast and cheap blockchain that is somewhat widely accepted and adopted, Solana is a great option to go for.
Once you have decided on which blockchain you are going to use, it’s time to create a wallet where you will store this NFT. When choosing this wallet, you need to make sure that this wallet supports your selected blockchain. Choosing this wallet is very important, as you will be storing your NFTs there and you need to make sure that you will be comfortable with this wallet. It’s also important to consider the security of this wallet. There are software and hardware wallets that have different levels of security, but using them is also very different. Because of this, you need to clearly understand your preferences and choose the wallet based on that. Here are the most popular wallets for both software and hardware wallets:
MetaMask: Probably one of the most popular software wallets out there, MetaMask is a great option for those that are looking for a non-custodial software wallet. It comes as a browser extension and mobile app and supports numerous blockchains including Ethereum and Solana. Another upside to MetaMask is that it’s completely free.
Ledger Stax: This is a hardware wallet that comes in the form of a very small smartphone. Ledger Stax supports a number of cryptocurrencies and blockchains, but what makes it stand out from the rest of Ledger wallets is the ability to customize it to display your NFT. Having this wallet makes owning and creating NFTs a fun experience. But the downside to this wallet is that it costs $300.
The last step before you start creating your own NFT is to choose which NFT platform you want to utilize. There are NFT platforms that give you the option of just creating NFTs, but the ones you should look for are big NFT marketplaces. These marketplaces give you the option of creating NFTs and also the ability to sell them on their platform. With this, you are able to create and list NFTs in the same space and don’t need to use different platforms. Some of the most popular NFT marketplaces are the following:
OpenSea: The biggest NFT marketplace out there, OpenSea is probably the best place to go when creating, buying, and selling NFTs. The primary market on OpenSea is focused on Ethereum-based NFTs, but it also supports Solana, BNB, Polygon, and many other chains.
Binance NFT: Binance, the largest crypto exchange in the world, has its own NFT marketplace that allows creating, buying, and selling NFTs. While it’s smaller than OpenSea, you will still be able to browse and find many NFTs that are also present on OpenSea. Binance NFT supports Ethereum, BNB, and Polygon chains.
Now you have finally reached the step where you create an NFT. This process will differ depending on the platform you use, but in most cases, every platform will have the same system. The only differences that you will find will mostly be design or wording changes, but the process as a whole will be similar. Here are the steps that you will need to go through on almost every platform.
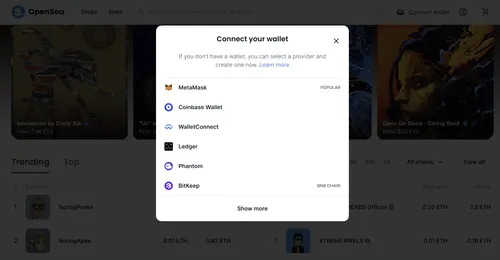
The first step when creating an NFT on these platforms is to connect your wallet. When visiting these platforms, they will have a special wallet button or icon at the top menu. There you will need to select the wallet you are going to connect to and then simply confirm the connection through your wallet. Below you can see how it looks on OpenSea.
After we have connected our wallet, we will need to find the “create” option. Every big NFT platform and marketplace will have this option. Here you will be given the different options and tools for creating your NFT.
Once there, it’s time to upload the file of what you want to turn into an NFT. When uploading this file, it can be an image, video, music, or anything else digital. Some platforms such as OpenSea, even allow uploads from externally hosted websites.
After this, you will need to create properties for your NFT. You need to name your NFT, add a description, and add other optional properties. Here you can give your NFT utilities and also set the limit on how many can be minted.
After you have imputed every property for your NFT, it’s time to choose the blockchain. When selecting this, make sure that you really want to use this blockchain, since you will not be able to change it in the future.
This is where you will be finishing creating your NFT. At this point, you would have provided everything needed and the last thing left to do is to simply press the finish button. Once done, your NFT will be created and moved to your wallet.
Once the NFT is created you are free to do whatever you want with it. But the most popular step after creating an NFT is obviously to sell it. If you created your NFT on a platform that does not have a marketplace, you will need to visit the one that does. Once there you will need to connect your wallet once again and simply list an NFT for sale.
When listing this NFT, you will be asked to provide some details, such as how much you are selling it for and how long you wish the sale to last. After this, you will need to finalize the listing, for which you will need to pay transaction fees. This fee will be charged by the blockchain and will depend on the blockchain used.
Our partner, XM, lets you access a free demo account to apply your knowledge.
No hidden costs, no tricks.
Yes, you can create an NFT for free, but not entirely. When you are creating an NFT, a platform, such as OpenSea, won’t charge any fees for their services, but it does not mean that you don’t have to pay anything. NFTs are part of the blockchain and they are transferred to and from your wallet. Because of this, you will need to pay a blockchain fee when minting a new NFT. You will also need to pay a fee when you actually sell an NFT. Since these platforms don’t charge fees for creating and listing these NFTs, they charge fees from sales in order to make money.
There is no straightforward answer to this question. In essence, it’s profitable since you are not paying any fees other than blockchain fees. So any sale you make will land you a good profit. But the NFT market is really competitive and it’s not easy to sell NFTs if you are just starting out. If you believe that you can create an NFT that people will want to buy and you will be able to market it to a wide range of people, then yes, creating your NFT is profitable. But if you are thinking of just creating simple art NFTs with no other value and listing them for sale, the likelihood of actually selling them will be low.
© Copyright 2022, All rights reserved