

Our partner, XM, lets you access a free demo account to apply your knowledge.
No hidden costs, no tricks.

Creating your own crypto tokens might sound hard to do and complex. But it is the complete opposite. Creating your own token on the Binance Smart Chain is an easy process, and you don’t need to be a programmer to pull it off. BSC operates very similarly to Ethereum, which means that you can even use ERC-20 tokens as a template.
"..haven't you always wanted your own crypto currency? ..honestly, it's not that hard now. "- NetworkChuck
When creating your token on BSC all you need is a Metamask wallet, Remix, and a small understanding of the Solidity language. This process is easy to follow and even someone with little understanding of blockchain and programming will be able to execute it with a little bit of effort.

When discussion about Binance starts, most newcomers to the crypto ecosystem will think of Binance as just a cryptocurrency exchange and nothing more. But this thought process is as wrong as they come. Binance has an entire fleet of crypto products, with most of them operating on the Binance Chain.
The Binance Chain is the blockchain developed by Binance to process and validate decentralized transactions which take place within Binance. This chain was also developed to house the Binance native token BNB. Another goal they had in mind was to give users different options to choose from. For example, whether they wanted to interact with smart contracts directly or to use Binance exchange according to trading volume.
But, the Binance Chain has some limitations. It was not built to facilitate smart contracts and offers limited capabilities when designing DApps. This created an incentive to develop the Binance Smart Chain.
Binance Smart Chain, compared with Binance Chain, has the capability to facilitate smart contracts and works in parallel with the regular chain. These two chains work together. BSC can also operate independently if something were to happen to the Binance Chain.
If you have had any experience with Ethereum, your experience with the Binance Smart Chain will not be much different. These two chains use the same codebase, but Binance has made some updates and is now considered the fastest and cheapest blockchain in the world.
We have discussed the Binance Chain and Binance Smart Chain and their differences. But there is one more difference that we have not mentioned. These two chains use somewhat different token standards for different purposes.
The BEP-2 token standard is what Binance Chain uses. For example, Binance native token BNB is built using the BEP-2 standard. This standard provides a technical framework that developers can use to create tokens on the Binance Chain. You should always use provided token standards. This guarantees that tokens will be usable within the applications and wallets that are available.
So what differentiates BEP-2 and BEP-20 tokens, from each other? When we want to launch tokens on the Binance Smart Chain we use the BEP-20 standard which provides a necessary framework. While BEP-2 are those tokens that are native to the Binance Chain. BEP-20 tokens are somewhat similar to ERC-20 tokens and are often compared with each other. With shared similarities come fundamental differences that differentiate these two tokens from each other as they operate on different blockchains.

As we mentioned, Ethereum's standard tokens are similar to the Binance Smart Chain's tokens. This also means that creating them is somewhat similar. Both of them can be developed by using the same programming language, tools, and thought process. Solidity is the programming language that you will be needing to create your BSC tokens, and the tools needed are a Metamask wallet and Remix.
There are two places we can create tokens, namely the Binance Smart Chain Testnet and Mainnet. The process of creating tokens is essentially the same in both of them. Tokens on Testnet don’t hold any value. But using testnet to first develop your token is better as it is a cheaper option.

Before we start developing our tokens we need to prepare some tools that we are going to be needing. We need to create a Metamask wallet, or some other compatible crypto wallet, connect it to the Binance Smart Chain node, and add some BNB to our wallet.
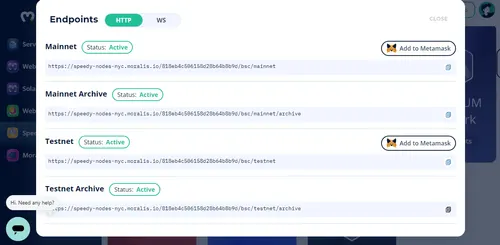
The first thing we need to do is to find the Binance Smart Chain nodes to connect them with our wallet. The most popular place which is visited to complete this process is Moralis. When we visit the website we have to go to the Speedy Nodes section. Here we will be presented with different blockchains that are available.

Once there, select BSC Network and copy Testnet Archive.
The next step we have to take after this is to connect those nodes with the wallet. Here we will discuss how to connect nodes to Metamask. This Metamask wallet will then be used to upload new tokens, as well as, to access those tokens.
To do so, go to the Metamask wallet or open it from your browser extension tab. Once there you will see Ethereum Mainnet at the top. Press it and choose the Add Network option.

There you will have to input some data that will be necessary to connect to the Binance Smart Chain. Input the following information into the necessary tabs.
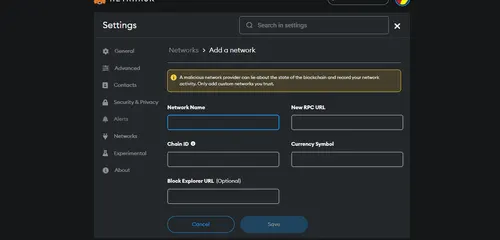
After this just press Save and you are done connecting to Binance Smart Chain Testnet.
The last thing we will be needing to do is to get some BNB on our wallet and we will be ready to start creating our token. The beauty of using Testnet to learn how to create tokens is that you can get Testnet BNB for free. To do so, go to https://testnet.binance.org/faucet-smart. Here enter the wallet address that you just transferred to the Binance Smart Chain Testnet and press Give me BNB. BNB should appear in your wallet within seconds. If this does not happen, double-check if you entered the correct information when switching networks.
Cryptocurrencies are just collections of codes. These codes usually share the same characteristics with already built standards such as BEP-20, ERC-20, TRC-20, and others. All we have to do is to copy the code of the token standard we want to build and make some minor changes.
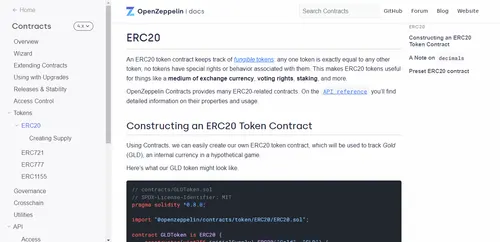
As we mentioned, when creating a new token, you don't need to write the whole code yourself, and you can just find already existing code and make minor changes to it. The best place to find those codes that we will be using as a foundation is OpenZepplin. Here you will find many different token standard codes which you can use as you wish. Because ERC-20 and BEP-20 tokens share similarities, we can take the ERC-20 code and use it to create a BEP-20 token.
Our next step will be to create a new smart contract. The best place to do this is Remix. This is where we will be programming our upcoming token. Visit remix.ethereum.org and find the Contracts tab. Once there, add a new document by pressing on a file icon at the top. This is where we paste the code and start building our new token.

When we copy the code we will need to change some parameters and make adjustments in order for our token to work.
When you enter the smart contract, the second line is where you will be specifying things such as the token’s name and ticker symbol. The next line is for the minting and here you specify how many tokens you want to mint and which wallet should receive those tokens.
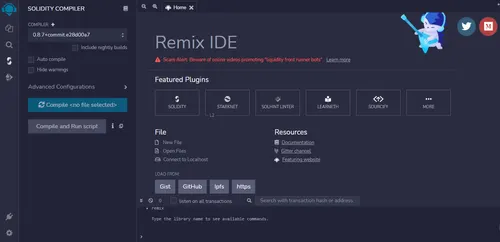
When you finish writing a smart contract, you need to put it through the compiler to check if there are any bugs and errors which need to be fixed. To do so, go to Solidity Compiler, which will be at the left of your screen under the search tool.
Here select which version of Solidity you are using for your contract. Then simply press compile and if there are no issues, you will be ready to move to the final stage.
The last step you have to take is to launch the token. To do this go to the Deploy & Run Transactions section which is under the compiler. The first thing we do here is to select the environment. Simply open up the pull-down menu and select Injected Web3. Under the Account section, make sure that it is the same address as your Metamask address. Everything else should remain as it is and just press Deploy.

With this previous step your token is finished and ready to be viewed. Shortly after you should receive a Metamask pop-up that will inform you of the transaction. Then you will be given a link that takes you to the Binance Smart Chain block explorer. Here you will see all the details of your newly created tokens.
To view your tokens in the Metamask wallet, return to the Remix Deploy & Run section. There you will see a list of Deployed Contracts with token addresses. Here copy the address of your newly created token. After this, return to Metamask and look for the button which says Import Tokens. There just enter your token address and the remaining tabs should automatically fill in. Once this is done, return to your main Metamask wallet and your newly created token should be present in your wallet.
Our partner, XM, lets you access a free demo account to apply your knowledge.
No hidden costs, no tricks.
Absolutely not. You can simply copy the code of already existing token standards and then adjust it for yourself. This process is not hard, and you don’t need much programming knowledge to get the hang of it.
BSC or Binance Smart Chain is a second blockchain for Binance and is being used for creating and deploying smart contracts, as the Binance Chain can not do it.
You can create a BSC token on Testnet for free, but these tokens don’t hold any value. Creating a token on BSC Mainnet will cost you around $50. This price can go up depending on the utility you input in your token.
© Copyright 2022, All rights reserved